
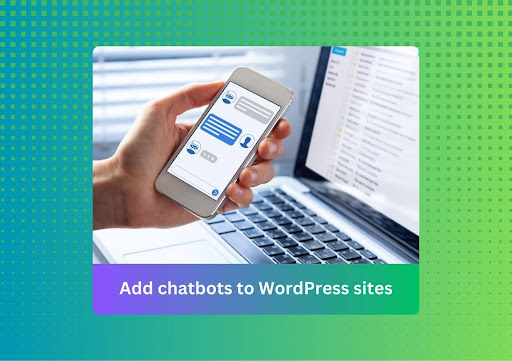
The Simple Way to Create a Chatbot for Your WordPress Website
WordPress chatbots can make your site super interactive and engaging. They can deliver instant support and a standout user experience.
But adding AI chatbots to a WordPress website can be difficult. It’s often technically challenging and requires high implementation costs. You may need a team of developers and months of work to create a functional chatbot. So, how do you make it simple?
This blog shows how to easily add a chatbot to your WordPress website (without any coding). You’ll also learn how to customize your chatbot’s appearance and features to make it more effective.
Why Add an AI Chatbot to Your WordPress Website?
Here are seven common use cases of WordPress chatbots: 1. Customer support: answer visitor questions and resolve issues 24/7 2. Lead generation: collect leads, qualify their needs, and save them to your CRM 3. Conversion optimization: ask the right visitors to use discounts, fill out forms, or visit a certain page at the right time 4. Escalations: escalate customer requests to the right human agent 5. Meeting booking: schedule qualified meetings for your sales team 6. Feedback collection: engage your customers and collect their feedback 7. Shopping assistance: recommend products and guide shoppers to find the right options
The Best AI Chatbots for WordPress Websites
The right AI chatbot platform can make all the difference. Here are some of the top WordPress chatbots you can try on your website to improve engagement:
1. Chatsimple: An advanced AI chatbot that can deliver human-like support, generate qualified leads, book sales meetings, and boost website conversions 2. Tidio: A simple AI chatbot for automating answering FAQs and simple queries 3. HubSpot: Free AI chatbot that can integrate with your HubSpot CRM and provide personalized responses 4. Chatra: A live chat tool for connecting with your visitors and converting them to your customers 5. WPBot: A lead generation AI chatbot that delivers unlimited support with a one-time purchase
How to Add a Chatbot to a WordPress Website [Without Coding]?
To simplify things, let’s consider the example of a no-code platform like Chatsimple. Chatsimple helps you build powerful AI chatbots that live on your website and engage every visitor with hyper-personalized responses. Here’s what you’ve to do:
- Open your WordPress dashboard, go to the Plugins tab, and click on "Add New Plugins."
- Search for the Chatsimple plugin and install it.
- Login to Chatsimple and go to the Dashboard tab.
- Copy the platform ID, chatbot ID, and user ID from the "Add chatbot to website" section.
- Open your Chatsimple plugin on WordPress and paste these IDs into the respective fields.
Easy, right? Now your AI chatbot will appear on your WordPress website to engage thousands of visitors simultaneously round the clock.
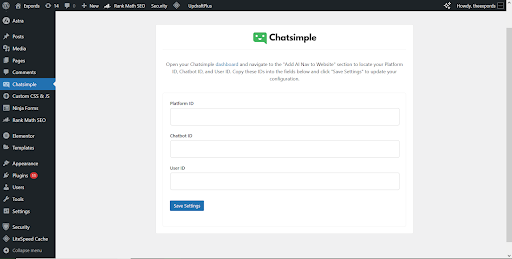 This image shows how to add a chatbot to a WordPress website using the Chatsimple plugin
How to Create and Customize a WordPress Chatbot?
So, you’ve added an AI chatbot to your website. But there is still more work left. You need to train and customize your chatbot so that it can work accurately and deliver a good user experience. Here's how to do it:
1. Add Training Materials
This is where you increase your AI chatbot's knowledge. Go to the Training Materials tab and upload relevant files, add your website URL, or train on simple text. The AI chatbot will automatically extract all the information to deliver accurate, helpful, and personalized responses to your visitors.
2. Add Questions and Answers
This will help you control how your chatbot responds to specific queries. Just go to the Questions and Answers tab and add all the important or common questions your website visitors can ask along with their responses. You can also turn on the Escalate with Email feature to receive an email whenever visitors ask a specific question.
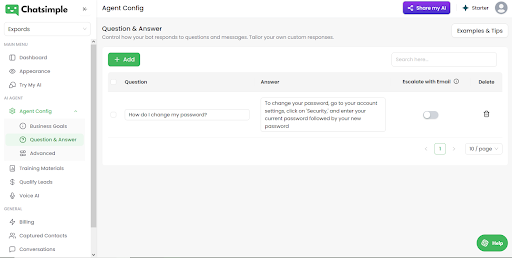 Add questions and answers
3. Configure Appearance
Your WordPress AI chatbot should look and feel like a part of your brand. Go to the Appearance tab and configure the chatbot's title, icon, background color, language, welcome messages, and sound effects. You can also change the widget button position, popup settings, and contact form fields.
4. Select an AI Model
Chatsimple supports the world’s best AI models, like GPT 4.5, Claude 3.7 Sonnet, DeepSeek V3, OpenAI o3-mini, and GPT-4o. Just go to the Advanced tab, click the drop-down menu under the "Select AI Model" section, and select any model based on your accuracy and speed needs.
 Select an AI model
5. Define the Agent's Personality
In the same Advanced tab, you can write prompts to define your chatbot's speaking style. You can set the chatbot's personality as professional, funny, or polite, ensuring it aligns with your brand.
6. Set Up Lead Qualification Questions
This step will help you add strategic questions that your chatbot will ask to gain customer insights. These can be about the customer's name, email, pain points, goals, budget, or urgency. Just go to the Qualify Leads tab, activate the feature, and add the qualification questions in sequence.
7. Define Business Goals
Here you can set goals for your AI chatbot. Go to the Business Goals tab and select a template to create custom goals like scheduling a meeting, watching a demo, using a special offer, visiting a page, or filling out a form. For each goal, you need to define the condition and the action. Here’s an example:
- Goal: Schedule more meetings
- Condition: If the user asks for a demo or shows interest
- Action: Ask them to book a meeting at [Calendly link]
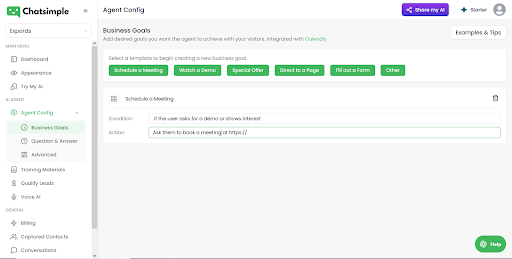 Define business goals
8. Activate Voice AI
This feature can make your WordPress website talk. It enables your AI chatbot to listen and speak just like humans. Go to the Voice AI tab and choose your chatbot's voice, set up a welcome message, and define its personality. There are also tons of customizations about call popups, call length, call language, and call goals to make your AI chatbot really effective.
Related read: The complete guide to AI voice agents
9. Integrate
Finally, integrate your AI chatbot with your existing platforms to ensure a smooth transfer of data. And you guessed it right, it can be done without coding. You can connect your AI chatbot to your CRM platforms like HubSpot, Zoho, Pipedrive, and Salesforce or messaging platforms like WhatsApp, Messenger, Instagram, and SMS with a few clicks.
And that’s it. Now, your WordPress chatbot is ready to engage visitors, help them find what they need, and turn them into your customers. Add Chatsimple's AI chatbot to your WordPress website today to stay ahead of the competition.
Conclusion
Adding an AI chatbot to your website doesn’t have to complicated. With the right no-code tool, you can do it in just a few minutes. It would help you engage more visitors and help them make instant purchasing decisions. Besides, AI chatbots deliver an unforgettable user experience that turns customers into your raving fans.